My blog has moved!

You will be automatically redirected to the new address. If that does not occur, visit
http://the-little-moments.com
and update your bookmarks.

Pages

Showing posts with label Decorating. Show all posts

Wednesday, February 20, 2013

vintage suitcases

“Are you shipping your kids off somewhere?”  my friend asked, looking at the little suitcases lined up in my living room. 

2013-02-02 002 2013-02-02 019

I actually use them to store games that have lots of pieces.

The big green baby is full of wooden blocks.

The medium brown holds Mr. Potato Head and his family.

The cute little blue one has magnetic dolls and accessories.  

Everything else gets tossed in the huge toy chest, the sea of lost and random toys, but I’ll take even limited organization.

2013-02-02 002 2013-02-02 017

I cut out some vinyl with my Silhouette machine to add a bit of interest to these yard sale suitcases.

2013-02-02 002 2013-02-02 016

I picked these up at three different sales for $2 each.  I guess that’s the going price for old suitcases?   Before I buy, I do a sniff test to made sure they don’t smell like mold or nasty stank. The little blue one smells a little bit like old lady perfume, but it’s not too bad.   Then I check the interior for any suspicious yucky spots.  Then I check that the latches work well. 

The kids use the suitcases EVERY.SINGLE.DAY. but mostly as step stools, or building blocks or “walls” for a fort in the living room. 

These suitcases are CLASSIC!  I love the the hard outside cases and the way they snap open and closed.  They just don’t make them like that anymore, right?

Thursday, February 14, 2013

DIY valentine’s decor


LOVE

Happy Valentine’s Day!   May this cold wintery day be filled with people and places that you love.  
I love making new decorations for holidays, and this is what I came up with for V Day this year.  Scraps of wood, scraps of paper, L-O-V-E cut out with my Silhouette machine and then a little bit of inking and painting to get that imperfect look that I love.  There’s no room for perfection around here!   I used wood glue to attach the letters onto another scrap piece of wood so they stay together as one piece. 
I know my day will be filled with kisses, hugs, chocolate treats and Cheesy Eddy’s carrot cake for dessert tonight! 
In this house, carrot cake counts as a vegetable!
 
The 36th AVENUE

Tuesday, February 12, 2013

White Farmhouse table

Can you believe Brian made this table from raw lumber?   Impressive, right?

2013-02-02 002 2013-02-02 024

There’s something about a man, MY MAN, making something useful and functional that is downright attractive.  The hat?  Not really sexy, but building me a freakin kitchen table?   I love it.  Of course he builds computers all the time, but building a table?   I had no idea he could do that.  He still finds ways to impress me, after all these years!
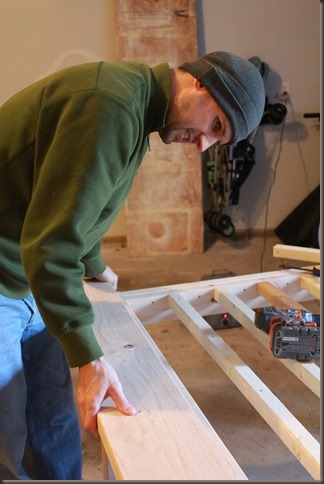
2012-12-24 002 2012-12-24 005

Look at that grin on his face!   I think he enjoyed the process this time ….it was way easier than the playhouse (I twisted his arm) built last year.  This table though, was built during the month of December when the weather was decent enough to work in the garage. 2012-12-24 002 2012-12-24 002
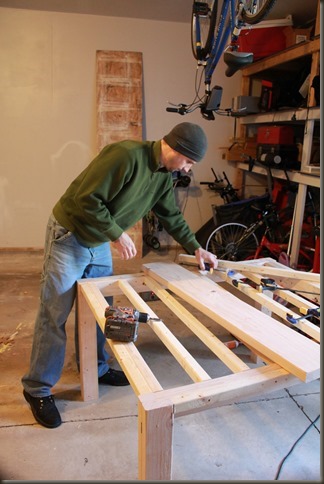
He followed Ana White’s free plans for the Farmhouse Table, adjusting the length and width to fit perfectly with our built in window seats.  There are 18 steps, but Ana explains it so well it makes anyone feel like they could tackle it too!   Our previous table was a $40 find on Craig's List  that I spend a lot of time painting and distressing.   I loved it, but it had a crack in the pedestal base, so no matter what I did, it was wobbly.  So annoying. 
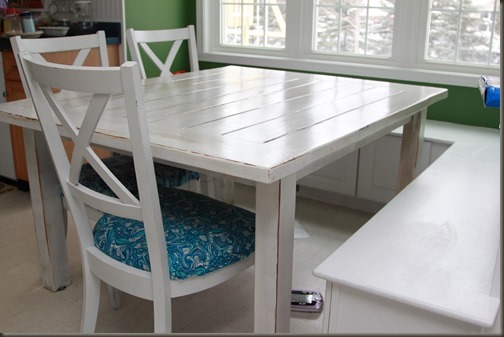
2013-02-02 002 2013-02-02 023

This baby weighs a TON and is the sturdiest table I’ve ever seen in my life.  After he completed the build, we moved the table into the living room for the month of January so I could work on the finish.    I wanted to take my time doing a nice job, just as he did in building it.    He gave me full permission to do anything I wanted to it, so I considered a blue stain, green stain, light walnut stain or white paint.

2013-01-12 001 2013-01-12 004

First I tried a light wood stain, but it didn’t take to the wood filler well. 

Then I painted it all white.   I hated it and sanded most of it off.

Then I put a dark stain over the paint and it looked good, but too dark for what I wanted in the kitchen.

So, I sanded that mostly off too then painted it a solid white.

It was too white…I knew that I couldn’t keep up a perfect white finish.

At this point I wanted to give up and just live with a wobbly table.   Brian sweetly offered to take it to the road for garbage pick up if I really hated it that much.  And he would never build me anything ever again.

My mom came to visit and helped me distress parts of the table, like the edges and grooves.  We looked on line for examples of distressed farm tables and saw some that looked great and were insanely priced.  ($1,300-1,800)   That made me feel better about my technique, especially since he bought all the lumber and screws for $105.  What a deal.
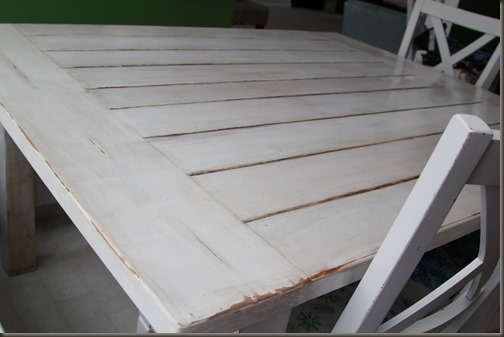
2013-02-02 002 2013-02-02 022

After a month of layering, sanding, staining and painting, I had a “new” table that looks “old”.   I sealed it with 8 coats of Polyurethane, sanding in between coats so it is super smooth.   There is so much texture and variation.  Anything the kids do to this table will only give it more character- genuine character!  LOL.

And the best part, for me anyway, is that it hides crumbs really well.  I clean it thoroughly once or twice a day, and that’s it.  If I can’t see it, it doesn’t bother me!  Now all I need is a new kitchen floor that disguises dirt and I’ll never have to clean again….

Sunday, February 10, 2013

Mixed media bird canvas


mixed media bird and sheet music canvas
My mom and I rub off on each other in different ways, but especially in the creative projects that we try.  She is really into mixed media right now, and I decided to give it a try too.  Basically, I layered on different things a little at a time over the space of a week or two.   Perfect for a busy mom.

I started out with a blank canvas from Hobby Lobby.
I glued some old sheet music paper to it.   I have a ton from when I played the flute. 
Then I smudged some brown paint all over and drew the tree branch.
Another day, I lightly painted some blue streaks up near the “sky” and some green streaks near the “ground”.
The birds are made from fabric scraps;  I ironed wonder-under to the fabric before I cut the shapes out, then ironed the birds right onto the canvas.  Hot glued some buttons on for eyes.
mixed media bird and sheet music canvas
Then Grace peeled the birds off my canvas when I wasn’t looking.   2013-01-31 003 2013-01-31 019
She left all the pieces in a pile under a table.  When I found the pile of birdie pieces, I started to wail and moan…. “Why, why, why?”  Brian came running in from the other room to check on me and comfort me in my distress.   “I’m fine. Really, I’m fine.”  I signed to him, embarrassed that my wailing was so loud that my DEAF husband could hear me from across the house and came running.   “It’s just that my project is ruined and I should have stayed in bed today!”   (Some days I’m more dramatic that others…..)

Well, turns out I was able to iron those birdies back on in about two minutes and hot glue the buttons back on in about 20 seconds.  Back on track.

 
The next day I used a celery heart to make some “flowers” in the corners.  I saw it on Pinterest, and this was the perfect opportunity to try it out! 
Celery + paint = flower! - Re-pinned by #PediaStaff.  Visit http://ht.ly/63sNt for all our pediatric therapy pins

(Source of celery picture)

2013-01-31 003 2013-01-31 016
I chose the quote “Life does not have to be perfect to be beautiful”, considering the imperfect route this canvas took while being created.  The words were printed it out on vinyl with my Silhouette machine.  I let Grace help me place the letters…. hoping that involving her NOW would deter her from peeling them off LATER.  2013-01-31 003 2013-01-31 005

I love how it turned out (even though I wish the entire quote was printed in blue).   BUT it doesn’t have to be perfect.   There is beauty in imperfection.
mixed media bird and sheet music canvas

Friday, December 21, 2012

framed art ~ $7

My Pinterest board is full of awesome ideas that I want to try someday.   But once in a while, a projects just leaps out at me; I get down to business and do it right away.

That’s what happened when I saw this project by I Am Mama Hear Me Roar .  She explains exactly how to print this giant subway art, and I did it exactly the same way after buying the rights to her layout.  ($3.50)

2012-12-10 002 2012-12-10 002

I painted my kitchen green a couple weeks ago.  It sure is a bright and happy color!  I love it except in the evening when there’s no natural light.

2012-12-10 001 2012-12-10 001

After hanging it up, I decided I wanted more colors, so I whipped out my “mommy markers” and filled in some of the words.  I had the frame down in the basement;   Brian gave it to me for our first married Christmas with a poster that I loved.  I no longer love the poster, but the frame is just right for this!


People are often unreasonable,
illogical and self-centered;
Forgive them anyway.

If you are kind,
people may accuse you of selfish ulterior motives;
Be kind anyway.

If you are successful,
you will win some false friends and true enemies;
Succeed anyway.

If you are honest and frank,
people may cheat you;
Be honest anyway.

What you spend years building,
someone could destroy overnight;
Build anyway.

If you find serenity and happiness,
they may be jealous;
Be happy anyway.

The good you do today,
people will often forget tomorrow;
Do good anyway.

Give the world the best you have,
and it may never be enough;
Give the world the best you’ve got anyway.

You see, in the final analysis,
it is between you and God;
It was never between you and them anyway.

Mother Teresa Poem

Wednesday, December 19, 2012

wood snowman family

No snow to speak of around here, but I made a little snow family who stand on the front porch to greet visitors.  My cousin came over for pizza and crafts.  The kiddos disappeared to the play room so we had a blast making little snow people. 
Wood:  extra 4x4 wood left over from the playhouse
Paint:  left over from some other project
Fabric scraps for scarfs and hats and buttons hot glued into place.

DIY wooden snowmen figures
TOTALLY FREE.  TOTALLY FUN.  TOTALLY CUTE!

They sit on a little sewing table that I found on the side of the road this fall.   They have fallen over a few times from the wind, but they are sturdy little guys.  No harm done.


DIY wooden snowmen

Monday, November 26, 2012

rocking chair love

I love rocking chairs.  I have 5 of them in my house.  My in-laws bought this one for us when Joshua was born and it’s my favorite one.  It’s got smooth moves and I’ve spent days, possibly weeks of my life rocking and nursing my little babies here.   I’m never getting rid of it.  Never.  I’ve moved it all around the house and it currently sits in the playroom because uh…I have four other rocking chairs.

My mom showed me some “happy chairs” made by Shawna Robinson, and we both decided that we needed something like that in our house too!

upcycle rocking chair
Add caption
upcycle rocking chair

Tuesday, October 30, 2012

“make it better than it was”


“Leave things better than when you found it” is a good way to approach life.

Well, once upon a time I found one of the bedroom doors all beat up.  The story goes that the girls locked themselves inside and were taunting Joshua.  He found a curtain rod (that had been pulled off the wall at some point) and started beating the door. 

I left the door that way for a long time in protest of the kids messing up everything in the house.  But eventually it bugged me enough to sand it down and repaint the freakin door.   It was a thankless task…totally uninspiring…. until I realized I could not only fix the door, but make it awesome.


2012-09-27 001 2012-09-05 002

My silhouette machine cut out some funky pink flowers.

2012-10-01 001 2012-09-29 004

This is not the last door that I will make AWESOME!

Monday, October 29, 2012

Flower re-do

I saw these golden flowers at at estate sale and was able to get them for $5 each.   I knew they would be a super fun decorating opportunity for the girls.  

2012-09-27 001 2012-09-10 002

I saved them for a gorgeous sunny day when they could paint outdoors.   They love to paint almost as much as I hate the mess that painting makes.   I usually try to save painting time for when my mom is up to visit!2012-09-27 001 2012-09-10 003

The flowers turned out (mostly) pretty, and we hung them in different places around the playhouse. 

2012-10-01 001 2012-09-29 005

2012-10-01 001 2012-09-29 014

Friday, October 26, 2012

HIdden inspiration

BEFORE:  Messy boring  cupboards

2012-09-27 001 2012-09-10 001

AFTER:  messy, inspirational cupboards

2012-09-27 001 2012-09-10 004

I hot glued the background paper to the inside of the cupboards.  I know from previous projects that it pops right off without any damage.

2012-09-27 001 2012-09-10 005

Now I have a reason to keep on pinning into my “Lovely Quotes” board!

Thursday, October 25, 2012

Framed art

I found some super awesome wood frames at Kirkland’s recently.  They were on clearance, plus I had a coupon so I ended up getting about 12 of them.   Smile   I gave the one below as a wedding present with one of my favorite quotes in the center. 

2012-10-14 001 2012-10-03 001

I considered lining up a bunch of them above the couch.   I’d have to replace the centers of them all;  there’s a shoe, an owl and some birds.   The owl is pretty cute, though.

2012-10-14 001 2012-10-03 009

Or maybe I’ll put a bunch of canvas  along the ledge.  

2012-10-14 001 2012-10-03 013

Maybe just three for now, and I’ll scour pinterest for something fun for the middle canvas.

2012-10-14 001 2012-10-03 014

Tuesday, October 2, 2012

Zebra Chair

BEFORE:  boring (free) office chair

AFTER:  Soft zebra chair cover

2012-09-27 001 2012-09-11 001

A friend asked if we wanted an office chair a couple years ago.  One of his company branches had closed and there were 20 extra ergonomically correct chairs sitting around in his location.  His company wanted them gone ASAP so he snagged one for us.  

2012-09-27 001 2012-09-12 014

It has about 25 options for adjustments…see?    But all those levers scared me from taking it apart to spray paint it and recover the seat cushions.  I thought about it for a couple of years, ha.  When I came across a yard of this fun zebra fabric at a garage sale – BOOM.  I decided to plunge ahead and make a slipcover.

2012-09-27 001 2012-09-12 013

The back of the chair is basically like a fitted pillow case.  The bottom is not finished off so I can yank it off and wash if needed.   The seat cushion has a plastic hard case on the bottom half, so I was able to tuck the zebra fabric in using a flat head screwdriver. 

CHAIR: FREE

FABRIC: $2

TIME: about an hour

Brian didn’t have too much to say about my chair update;  he smiled and nodded his head at my big reveal.   Then he made sure I would leave his office chair alone.  I guess he likes boring black chairs…..

2012-09-27 001 2012-09-12 016

With some of the extra fabric, I saw a fancy zebra running around the house.

Check out Roadkill Rescue for an amazing assortment of trash to treasure projects!

Saturday, July 28, 2012

live, laugh, love, lounge


IMG_3040

Someday when I’m old, I’ll look back on the early years of 2000 and remember that every house in America had some kind of home dec that said:

LIVE, LAUGH, LOVE

It’s so over-used that I couldn’t help but make fun of it on my window, and add my own word to live by “LOUNGE”.

I found a pair of these lovely 4 pane windows on the side of the road on garbage pick up day.   I was on my way to work with an empty car, so I pulled off the road and loaded them up.   I cleaned them up a little and love the chippy blue paint color.  I screwed them nice and tight into the studs.

My silhouette machine cut out the words for me.

What other “L” words or 4 word combos could I use up there?

Sunday, May 27, 2012

Basement Stairs


Isn’t that yellow wallpapered staircase gorgeous?   Infarrantly Creative featured it recently on 5 Ways to Decorate with Wallpaper.   I couldn’t stop thinking about it and goggled “yellow wallpaper” a million different ways.  I couldn’t find anything, so I went to the store and bought a beautiful scrapbook paper pad where the papers all coordinate.

IMG_1212


My stairs needed to be painted anyway (and cleaned, ahem) so I used some navy blue to freshen it up. I modpodged the papers onto the back of the stair treds and Voila! I have cool stairs! My basement is an unfinished disaster zone, but I smile every time I see them.


IMG_1218

Friday, May 18, 2012

Play Room

I switched things around at my house….again.  I decided to put the girls together in one bedroom (beds and dressers) and use the extra bedroom for toys.    I’ve tried all kinds of sleeping arrangements in our four bedroom house trying to find the right set up.

I painted one wall of the play room dark purple as an accent wall. It’s actually called “grape jelly” and I love the color.   The pendent garland is made out of scrapbook paper that I folded in half and then sewed together.  I used it as a party decoration, but decided it looked fun in this room too.

001

The girls helped me paint this $20 book shelf I got from Craig’s List. It’s perfect for doll houses, and My Little Pony villages.

003

Papa John made the play kitchen as a Christmas present one year.  It’s been down in my real kitchen for a couple of years, but this is one of the best things we’ve moved to the play room!   All those dishes….all that plastic and wooden food. 

004

I painted the flowers on the walls a few years back and both of my girls slept in the wooden cradle when they were babies.  Awwww.   Now we throw stuffed animals in there and it helps with organization a little.


007

Sometimes the room looks like this…sometimes not so much…..

 001

The best part is that I can just close the door and the toy room “disappears”.


Made by Brian Trager